
")


Replacing a car door lock actuator can seem like a daunting task, but with the right guidance, you can accomplish it with confidence. Our comprehensive guide is designed to walk you through the process step-by-step, ensuring that you can tackle this task and save money in the process.
By following this guide, you’ll not only learn how to replace the door lock actuator yourself, but you’ll also gain a valuable new skill. This guide covers everything from understanding the role of a door lock actuator to the final steps of reassembling your door panel.
Key Takeaways
- Understand the function and importance of a car door lock actuator.
- Learn the step-by-step process to replace the actuator yourself.
- Identify the tools needed for the replacement.
- Discover tips to avoid common mistakes during the process.
- Gain confidence in your ability to perform car repairs.
Understanding the Door Lock Actuator
Understanding the door lock actuator is essential for diagnosing and fixing issues with your car’s door locking mechanism. The door lock actuator is a crucial component that facilitates the locking and unlocking of your vehicle’s doors.
What is a Door Lock Actuator?
A door lock actuator is an electric or mechanical device responsible for controlling the locking mechanism of your car’s doors. It is typically located inside the door and is connected to the door lock. When you press the lock or unlock button, either on your key fob or inside the car, the actuator receives a signal to perform the corresponding action.
How Does It Work?
The operation of a door lock actuator involves a complex interplay of electrical signals and mechanical movements. When the actuator receives a signal to lock or unlock the door, it translates this signal into a mechanical action that moves the lock rod, thereby securing or releasing the door lock. This process is usually facilitated by an electric motor within the actuator.
To better understand the process, here’s a simplified breakdown:
| Step | Description |
|---|---|
| 1 | Signal Reception: The actuator receives a signal from the lock/unlock button. |
| 2 | Signal Processing: The signal is processed, and the actuator determines the required action. |
| 3 | Mechanical Action: The actuator performs the mechanical action to lock or unlock the door. |
Signs of a Failing Actuator
Identifying a failing door lock actuator early can save you from being locked out or facing more significant repairs down the line. Common signs include:
- Unusual noises coming from the door when attempting to lock or unlock.
- The door lock not responding to the key fob or the lock button inside the car.
- Inconsistent locking or unlocking behavior.
If you’re experiencing any of these issues, it may be time to consider door lock actuator repair or replacement. Understanding how to replace door lock actuator components can be invaluable. Moreover, being able to perform basic door lock actuator troubleshooting can help diagnose the problem more accurately.
Tools and Materials Needed
Before starting the DIY door lock actuator replacement, it’s crucial to gather all the necessary tools and materials. Having everything ready will make the process smoother and less frustrating.
Essential Tools for the Job
To begin, you’ll need a set of basic tools that are commonly found in most garages or toolboxes. These include:
- A screwdriver set (both Phillips and flathead)
- Pliers (needle-nose and slip-joint)
- Torx screwdriver (depending on your vehicle’s make)
- Socket wrench set
Materials Required for Replacement
The most critical material for the replacement is the new door lock actuator itself. Ensure that you purchase an actuator that is compatible with your vehicle’s make and model. Additionally, you may need:
- Electrical connectors or wiring (if your new actuator doesn’t come with them)
- Screws or bolts (if not included with the new actuator)
Here’s a summary of the tools and materials needed in a tabular format:
| Tools/Materials | Description |
|---|---|
| Screwdriver Set | Phillips and flathead screwdrivers |
| Pliers | Needle-nose and slip-joint pliers |
| New Actuator | Compatible with your vehicle’s make and model |
| Electrical Connectors/Wiring | If not included with the new actuator |

Safety Gear Recommendations
Safety should always be your top priority when working on your vehicle. Recommended safety gear includes:
- Gloves to protect your hands from cuts and abrasions
- Safety glasses to safeguard your eyes from debris
By having the right tools, materials, and safety gear, you’ll be well-prepared to successfully complete the door lock actuator installation guide and fix door lock actuator issues.
Preparing Your Vehicle for Replacement
Before you start replacing your car door lock actuator, it’s crucial to prepare your vehicle properly. This step ensures a smooth and safe replacement process.
Making Sure the Car is Secure
First, ensure your car is secure and safe to work on. Engage the parking brake and consider using wheel chocks to prevent any movement. It’s also a good idea to work in a well-lit area.
Disconnecting the Battery
To avoid any electrical shocks or damage to your vehicle’s electrical system, disconnect the battery before starting the replacement. Locate the battery and use a wrench to loosen the nut on the negative terminal clamp. Then, remove the clamp from the terminal. This step is crucial for safety.
Opening the Door Panel
To access the door lock actuator, you need to open the door panel. Start by removing the screws or clips that hold the panel in place. Gently pry the panel off, taking care not to damage the door or the panel itself. You may need to use a trim removal tool to help with this process.
Once the panel is removed, you’ll have access to the actuator. Take a moment to inspect the area and familiarize yourself with the components and wiring.
By following these steps, you’ll be well-prepared to replace your car door lock actuator efficiently and safely. Remember, a successful DIY replacement requires patience and attention to detail.
Removing the Old Actuator
Now that you’ve accessed the door’s internal components, it’s time to focus on removing the old actuator. This step is crucial for the successful replacement of your car’s door lock mechanism.
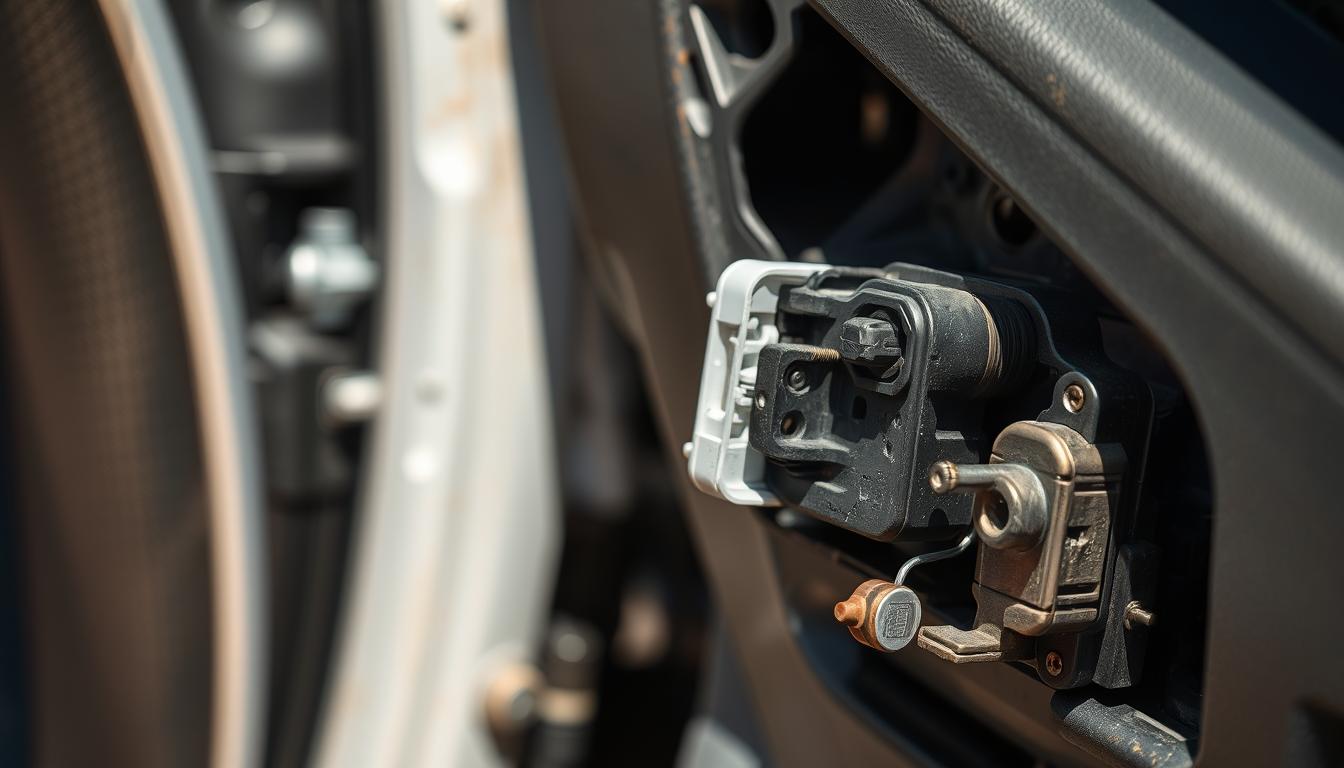
Locating the Actuator
The door lock actuator is typically located inside the door, attached to the door lock mechanism. It’s usually a small, rectangular or square-shaped device with electrical wires connected to it. To locate it, look for the wires leading to the lock mechanism and trace them back to the actuator.
Detaching Electrical Connections
Before you can remove the actuator, you need to detach its electrical connections. This is usually done by pressing a release tab or removing a connector clip. Be gentle to avoid damaging the wires or the connector. Once disconnected, you can set the electrical connector aside, making sure it’s not damaged or pinched.
Unscrewing the Actuator
The actuator is typically held in place by screws or clips. Use a screwdriver to remove these screws, and then carefully pull the actuator away from its mounting. Take note of any retaining clips that may need to be released. With the screws removed, the actuator should come free, allowing you to remove it completely.
| Step | Action | Tools Needed |
|---|---|---|
| 1 | Locate the Actuator | None |
| 2 | Detach Electrical Connections | None |
| 3 | Unscrew the Actuator | Screwdriver |
By following these steps, you’ll be able to successfully remove the old door lock actuator, making way for the installation of the new one.
Installing the New Actuator
Installing a new door lock actuator is a straightforward process that requires attention to detail. This step is crucial in ensuring that your car door lock functions properly after the replacement.
Positioning the New Actuator
To start, carefully position the new actuator in its designated space. Ensure it is aligned with the mounting holes and any other relevant fixtures. Proper alignment is key to avoiding any complications during the installation process.
Reconnecting Electrical Wires
Once the new actuator is in place, reconnect the electrical wires. It’s essential to match the wires to their correct terminals to avoid any electrical issues. Double-check the connections to ensure they are secure and not loose.
Securing the New Actuator in Place
After reconnecting the electrical wires, secure the new actuator using the screws or bolts provided. Make sure they are tightened firmly but avoid over-tightening, which could damage the actuator or its housing.
Here’s a summary of the key steps and tools required for installing the new actuator:
| Step | Action | Tools Required |
|---|---|---|
| 1 | Position the new actuator | None |
| 2 | Reconnect electrical wires | Wire strippers, electrical tape |
| 3 | Secure the actuator | Screwdriver, bolts/screws |
By following these steps, you should be able to successfully install the new door lock actuator and have your car door functioning as expected. Remember, if you’re not comfortable with this process, it’s always best to consult a professional.
Reassembling the Door Panel
With the new actuator installed, the next step is to reassemble the door panel, ensuring everything is properly aligned and secured. This process is crucial for completing the DIY door lock actuator replacement successfully.
Properly Aligning the Door Panel
To start, carefully align the door panel with the door frame, ensuring that all edges are properly matched. It’s essential to refer to your vehicle’s manual or notes taken during disassembly for specific guidance on alignment.
“A well-aligned door panel is key to a smooth door lock operation.” Misalignment can lead to issues with the door lock mechanism, so take your time to get it right.
Reinstalling Screws and Clips
Once the panel is aligned, begin reinstalling the screws and clips. Start with the screws, tightening them securely but avoiding overtightening, which can damage the panel. Next, reattach the clips, ensuring they are firmly in place.

Testing the Door Lock Mechanism
After reassembling the door panel, it’s crucial to test the door lock mechanism. Use the door lock switch to check that the lock engages and disengages smoothly. If you encounter any issues, refer to the troubleshooting section for assistance.
As
“The devil is in the details,”
so too is the success of yourstep-by-step door lock actuator replacementproject dependent on the meticulous reassembly and testing of the door panel.
By following these steps, you’ll ensure a successful DIY replacement, restoring your car’s door lock functionality.
Troubleshooting Common Issues
Sometimes, problems can arise after installing a new door lock actuator, and knowing how to troubleshoot them is essential. Even with a successful replacement, issues such as the actuator not functioning, a misaligned door panel, or electrical connection problems can occur.
Actuator Not Functioning
If your new actuator is not working, first check the electrical connections to ensure they are secure and not damaged. It’s also crucial to verify that the actuator is properly aligned and screwed into place. If the issue persists, consult your vehicle’s manual or contact a professional for further assistance.
Misaligned Door Panel
A misaligned door panel can cause issues with the door lock mechanism. To fix this, ensure that the door panel is properly aligned with the door frame. Check for any obstructions or debris that might be causing the misalignment. Realign the panel and secure it with the appropriate screws and clips.
Tips for realigning the door panel:
- Check the door frame for any damage or obstructions.
- Ensure all screws and clips are securely in place.
- Test the door lock mechanism after realigning the panel.
Electrical Connection Problems
Electrical connection issues can prevent the actuator from functioning correctly. Inspect the wiring for any signs of damage or wear. Ensure that all connections are clean and secure. If you’re unsure about how to proceed, consider consulting a professional mechanic or auto electrician.
Common electrical connection issues include:
- Corrosion on the connectors.
- Damaged or frayed wiring.
- Loose connections.
By addressing these common issues, you can ensure your door lock actuator functions properly and maintain the security of your vehicle.
Tips for Maintaining Your Door Locks
Ensuring your car’s door locks are well-maintained is vital for both security and convenience. Proper maintenance not only extends the lifespan of the locking mechanism but also prevents potential issues that could leave you stranded.

Regular Inspections
Regular inspections are crucial for identifying any potential problems early on. Check the door locks for any signs of wear or damage, such as rust or corrosion, and ensure that all components are functioning as expected. It’s also a good idea to test the locking mechanism multiple times to ensure it’s working smoothly.
Lubrication Practices
Lubrication is key to keeping your door locks operating smoothly. Use a suitable lubricant, such as silicone spray or graphite powder, to lubricate the locking mechanism. Avoid using oil-based lubricants as they can attract dirt and grime, potentially causing more harm than good. Apply the lubricant to the keyhole, hinges, and other moving parts, then operate the lock several times to distribute it evenly.
As Tom Harris, a renowned automotive expert, once said,
“Regular lubrication of your car’s door locks can significantly reduce the risk of mechanical failure and ensure they continue to function properly over time.”
Recognizing Early Signs of Wear
Being able to recognize the early signs of wear on your door lock actuator or other components can save you from more significant problems down the line. Look out for signs such as slower than usual locking or unlocking, unusual noises, or if the lock feels loose. Addressing these issues promptly can prevent more costly repairs in the future.
By following these tips for maintaining your door locks, you can ensure they continue to function properly and securely. Regular DIY car door lock actuator replacement or repair can be avoided with proper care, saving you time and money.
When to Seek Professional Help
While replacing a car door lock actuator can be a DIY-friendly task, certain situations may require professional assistance. It’s essential to recognize when you’re in over your head to avoid further damage or safety risks.
Complex Issues Beyond DIY
Some issues related to your car’s door lock actuator may be too complex to tackle on your own. For instance, if the problem is linked to the vehicle’s computer system or if there are intricate wiring issues, it’s best to consult a professional mechanic. They have the necessary tools and expertise to diagnose and fix complex problems efficiently.
Examples of complex issues include:
- Faulty wiring that requires specialized equipment to diagnose.
- Issues with the car’s central locking system that are not limited to the actuator.
- Problems that require reprogramming or updating the vehicle’s software.
Safety Concerns
Safety should always be your top priority when working on your vehicle. If you’re unsure about any aspect of the replacement process or feel uncomfortable, it’s wise to seek professional help. Professionals are trained to handle potentially hazardous situations, such as dealing with electrical systems.
Consider seeking professional help if:
- You are not confident in your ability to safely disconnect the battery.
- You encounter unexpected electrical shocks or sparks during the process.
- You are unsure about how to properly handle or dispose of old electrical components.
Warranty Implications
If your vehicle is still under warranty, attempting to replace the door lock actuator yourself could potentially void the warranty. It’s crucial to review your warranty terms before starting the replacement process.
| Warranty Status | DIY Replacement | Professional Replacement |
|---|---|---|
| Under Warranty | May void warranty | Warranty remains valid |
| Out of Warranty | No impact on warranty | No impact on warranty |
Understanding the implications of DIY repairs on your vehicle’s warranty can save you from unexpected costs and hassles down the line.
Understanding Warranty Information
Understanding your vehicle’s warranty is vital when you’re planning to replace the door lock actuator yourself. This knowledge can help you navigate the process more smoothly and potentially save on costs.
Checking Your Vehicle’s Warranty
The first step is to check if your vehicle is still under warranty. You can do this by:
- Reviewing your owner’s manual for warranty information
- Contacting your dealership or manufacturer’s customer service
- Checking online through the manufacturer’s website or your account portal
Make sure to have your Vehicle Identification Number (VIN) handy as it may be required to check your warranty status.
Manufacturer’s Coverage
Once you’ve confirmed that your vehicle is under warranty, it’s essential to understand what is covered. Typically, a manufacturer’s warranty covers repairs and replacements for parts and labor due to defects in materials or workmanship.
Key aspects to check:
- Duration of the warranty
- Parts covered (e.g., door lock actuator)
- Any conditions that might void the warranty

Warranty Claims Process
If your door lock actuator replacement is covered under warranty, you’ll need to follow the manufacturer’s warranty claims process. This typically involves:
- Notifying the dealership or manufacturer about the issue
- Providing proof of purchase and warranty documentation
- Following the instructions given by the manufacturer for the next steps
It’s crucial to keep detailed records of your communications and any repair estimates or invoices.
By understanding your warranty and following the proper procedures, you can ensure that your DIY door lock actuator replacement or repair is covered, saving you time and money.
Cost Considerations for Replacement
The cost of replacing a door lock actuator can vary significantly based on whether you choose a DIY approach or hire a professional. Understanding these costs is essential for making an informed decision that suits your budget and needs.
DIY vs. Professional Replacement Costs
When deciding between a DIY replacement and hiring a professional, the costs can be quite different. A DIY replacement primarily involves the cost of the new actuator and any necessary tools. On the other hand, hiring a professional includes labor costs, which can significantly increase the total expense.
DIY Costs: The cost of a new door lock actuator can range from $50 to $200, depending on the quality and brand. Additional tools may be required, which can add to the overall cost.
Professional Costs: Labor costs can vary widely depending on the mechanic’s rates and the complexity of the job. On average, you can expect to pay between $100 to $300 for labor, in addition to the cost of the new actuator.
| Cost Component | DIY Cost | Professional Cost |
|---|---|---|
| New Actuator | $50-$200 | $50-$200 |
| Labor | $0 | $100-$300 |
| Total | $50-$200 | $150-$500 |
Budgeting for Parts and Tools
For a DIY replacement, it’s essential to budget for the new actuator and any necessary tools. Some tools, like screwdrivers and trim removal tools, are commonly found in most toolkits. However, specific tools may be required for certain models, so it’s crucial to check your vehicle’s manual or online resources.
Hidden Costs to Consider
There are several hidden costs to consider when replacing a door lock actuator. These can include:
- Additional repairs: If other components are damaged during the replacement process, additional repairs may be necessary.
- Diagnostic fees: Some professionals may charge diagnostic fees before starting the replacement.
- Potential for further issues: If the replacement is not done correctly, it can lead to further issues down the line, such as misaligned doors or electrical problems.
By understanding these cost considerations, you can make a more informed decision about whether to replace your car door lock actuator yourself or seek professional help.
Frequently Asked Questions
Understanding the FAQs about door lock actuator replacement can simplify the process. Many DIY enthusiasts have questions about the replacement process, and addressing these concerns can make the task less daunting.
How Long Does the Replacement Process Take?
The time it takes to replace a door lock actuator can vary depending on your level of experience and the specific vehicle model. Generally, it can take anywhere from 30 minutes to a few hours.
For those familiar with car repairs, the process might be quicker. However, if you’re new to DIY car repairs, it’s advisable to allocate a few hours to ensure you have enough time to complete the task without feeling rushed.
Can I Replace the Actuator Without Special Tools?
While some basic tools are necessary, you don’t necessarily need “special” tools beyond what’s typically found in a DIY toolkit. Essential tools include a screwdriver set, pliers, and potentially a trim removal tool.
Having the right tools can make the process smoother, but it’s also important to consult your vehicle’s repair manual for specific tool recommendations.
What If the New Actuator Fails?
If the new actuator fails, it could be due to incorrect installation, a defective part, or an underlying issue with your vehicle’s electrical system.
Troubleshooting the problem involves checking the installation, consulting the manufacturer’s troubleshooting guide, and potentially seeking professional help if the issue persists.

| Common Issues | Troubleshooting Steps |
|---|---|
| Actuator not functioning | Check electrical connections, ensure proper installation |
| Misaligned door panel | Realign the door panel, check for obstructions |
| Electrical connection problems | Inspect wiring, consult a professional if necessary |
By understanding these FAQs and having a clear guide, you can confidently replace your car’s door lock actuator and troubleshoot any issues that may arise.
Final Thoughts
Replacing your car’s door lock actuator can be a rewarding DIY project, enhancing your vehicle’s security and convenience. By following the steps outlined in this guide, you’ve taken a significant step towards mastering DIY car door lock actuator replacement.
Recap of Key Steps
To successfully complete the door lock actuator installation guide, remember to properly disconnect the battery, remove the door panel, and carefully detach the electrical connections. Reassembling the components in the reverse order of removal will help ensure a smooth DIY car door lock actuator replacement process.
Encouragement for DIYers
Completing this project not only saves you money but also gives you a sense of accomplishment. As you’ve seen, DIY car door lock actuator replacement is a feasible task with the right tools and guidance.
Useful Resources for Further Assistance
For additional help or more complex issues, consider consulting professional mechanics or referring to your vehicle’s manufacturer manual. Online forums and DIY communities can also provide valuable insights and support for your DIY endeavors.


