
")


Replacing spark plug wires is a crucial maintenance task that can significantly impact your vehicle’s performance. Over time, these wires can deteriorate, leading to poor engine performance, decreased fuel efficiency, and potentially causing damage to other engine components.
Understanding the importance of proper replacement techniques is vital. This guide is designed to walk you through the process, ensuring that your vehicle runs smoothly and efficiently.
Key Takeaways
- Understand the importance of replacing spark plug wires for optimal vehicle performance.
- Learn the steps involved in the replacement process.
- Identify the tools needed for the task.
- Discover tips for ensuring a successful replacement.
- Recognize the benefits of proper spark plug wire maintenance.
Understanding Spark Plug Wires
Before diving into the replacement process, it’s essential to understand the role of spark plug wires in your vehicle’s ignition system. Spark plug wires are responsible for transmitting the spark needed for combustion, making them a critical component of your car’s engine.
What Are Spark Plug Wires?
Spark plug wires, also known as spark plug cables, are the conduits that carry the high voltage from the ignition coil to the spark plugs. This voltage is necessary to create the spark that ignites the fuel-air mixture inside the engine’s cylinders. High-quality spark plug wires are designed to withstand the high temperatures and stresses within the engine compartment, ensuring a reliable spark and, consequently, optimal engine performance.
Importance of Spark Plug Wires
The importance of spark plug wires cannot be overstated. They play a crucial role in maintaining the health and efficiency of your vehicle’s engine. Worn or damaged spark plug wires can lead to decreased performance, reduced fuel efficiency, and potentially cause engine misfires. By understanding the significance of spark plug wires, you can better appreciate the need for regular inspection and timely replacement.
Signs of Worn Spark Plug Wires
Identifying worn spark plug wires is crucial for maintaining your vehicle’s performance and preventing potential issues. Common signs include visible wear or damage on the wires, engine misfires, decreased fuel efficiency, and rough idling. If you notice any of these symptoms, it’s likely time to replace your spark plug wires. Regular inspections can help you catch these issues early, ensuring your vehicle continues to run smoothly.
Tools and Materials Needed
The key to a successful DIY spark plug wire replacement lies in having the correct tools and materials at hand. Ensuring you have everything needed before starting the project will make the process smoother and more efficient.
Basic Tools for the Job
To begin, you’ll need some basic tools that are commonly found in most garages. These include:
- A set of pliers for gripping and bending
- Screwdrivers (both flathead and Phillips) for various tasks
- A socket wrench or ratchet for removing and installing spark plug wires
- Wire looms or protectors to keep new wires organized and protected
Recommended Spark Plug Wire Brands
Choosing the right spark plug wire brand is crucial for optimal performance. Some top brands include:
| Brand | Quality Rating | Price Range |
|---|---|---|
| NGK | High | $50-$100 |
| Bosch | High | $40-$90 |
| ACDelco | Medium-High | $30-$70 |
Optional Accessories to Consider
While not necessary, certain accessories can enhance the spark plug wire installation process. These may include:
- Spark plug wire routing diagrams to help guide the installation
- Dielectric grease to improve the connection between spark plug wires and boots
- Wire clips or ties to keep wires securely in place

Preparing for the Replacement
The key to a successful spark plug wire replacement lies in thorough preparation. Ensuring you have the right tools, knowledge, and safety measures in place will make the process smoother and less daunting.
Safety Precautions to Take
Before starting the replacement, it’s essential to take necessary safety precautions. Ensure your vehicle is parked on a flat surface and apply the parking brake. Disconnect the battery to prevent any accidental engine starts. Wear protective gear, including gloves and safety glasses, to protect yourself from potential hazards.
Gathering Your Materials
Gathering all the necessary materials beforehand will streamline the replacement process. You’ll need a set of new spark plug wires, a spark plug wire removal tool, and possibly some dielectric grease. Consult your vehicle’s manual to determine the correct type of spark plug wires required.
Assessing Your Vehicle’s Needs
Assessing your vehicle’s specific needs is crucial for a successful replacement. Check your vehicle’s manual or consult with a professional to determine if there are any specific recommendations for your vehicle’s make and model. This includes understanding the routing of the spark plug wires and any particular tools required.
By taking these preparatory steps, you’ll be well-equipped to handle the spark plug wire replacement with confidence. A well-prepared DIY enthusiast is better positioned to complete the task efficiently and effectively.
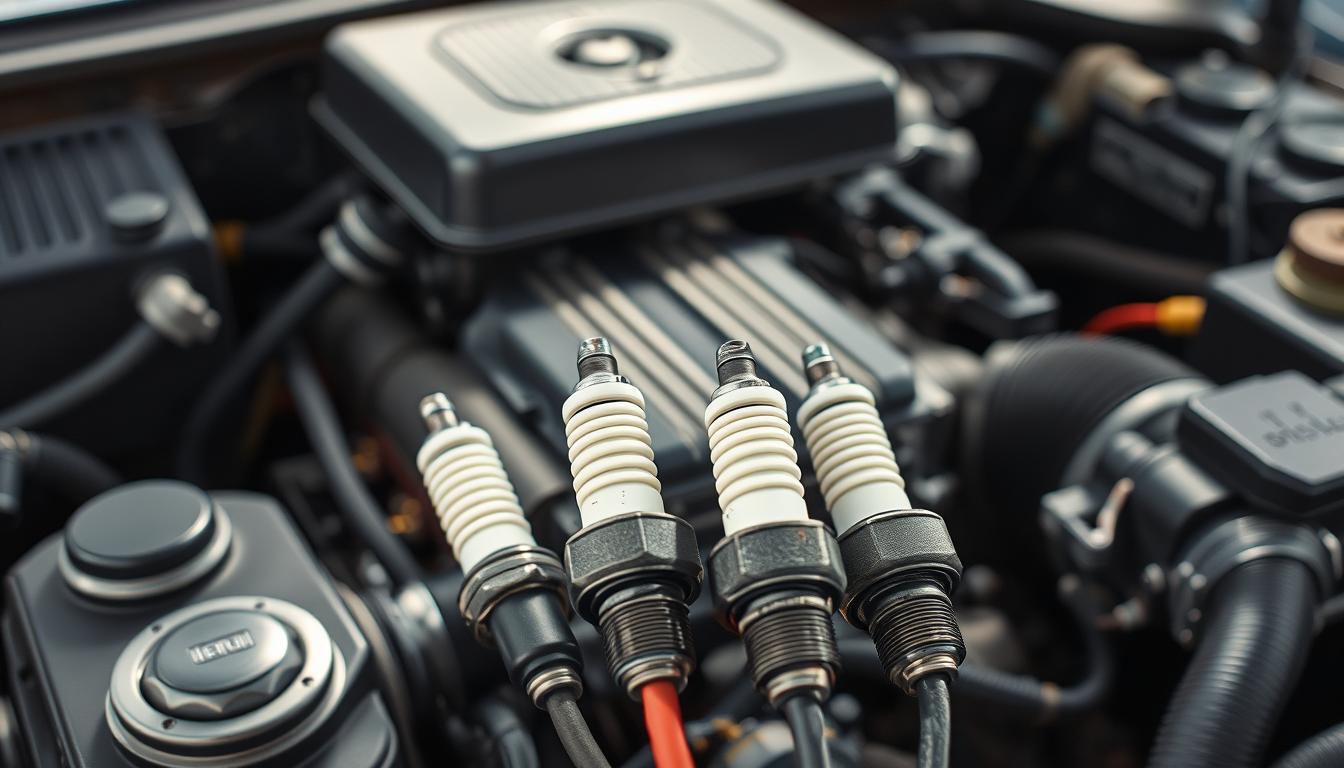
Locating the Spark Plug Wires
Understanding where your spark plug wires are located is vital for a successful DIY replacement. This knowledge will help you navigate the replacement process more efficiently.
Understanding Your Engine Layout
Your engine’s layout can vary significantly depending on the make and model of your vehicle. Generally, spark plug wires are connected to the spark plugs, which are embedded in the engine’s cylinder head. Familiarizing yourself with your engine’s configuration is crucial.
Identifying Wire Arrangement
Spark plug wires are typically arranged in a specific order, corresponding to the firing order of your engine. Consulting your vehicle’s repair manual can provide a diagram that illustrates this arrangement. Correct identification of the wire arrangement is key to avoiding confusion during the replacement process.
| Cylinder Number | Spark Plug Wire Color | Firing Order |
|---|---|---|
| 1 | Red | 1 |
| 2 | Blue | 3 |
| 3 | Green | 2 |
| 4 | Yellow | 4 |
Checking for Accessibility
Once you’ve identified the spark plug wires, check how easily you can access them. Some engines have tight spaces that may require special tools or angles to reach the wires. Assessing accessibility beforehand can save you time and frustration during the replacement.
By understanding your engine’s layout, identifying the wire arrangement, and checking for accessibility, you’ll be well-prepared to replace your spark plug wires efficiently.
Removing Old Spark Plug Wires
The process of removing spark plug wires requires patience and attention to detail. It’s a critical step in the replacement process, as improper removal can lead to damage to your engine or the new wires.
Step-by-Step Removal Process
To remove old spark plug wires, follow these steps carefully:
- Identify the Spark Plug Wires: Locate the spark plug wires connected to your spark plugs and ignition coil or distributor cap.
- Gently Pull the Boot: Start by gently pulling the boot off the spark plug. Avoid pulling on the wire itself to prevent damage.
- Remove the Wire from the Spark Plug: Once the boot is removed, you can see the wire’s connection to the spark plug. Gently twist and pull the wire off.
- Repeat for All Wires: Continue this process for all spark plug wires, taking note of their routing and connections.
As noted by a mechanic, “Removing spark plug wires is like solving a puzzle; you need to understand how it goes together to take it apart correctly.”
“The key to successful spark plug wire removal is patience and attention to detail. It’s not just about pulling wires out; it’s about doing it correctly to avoid any damage.”
Common Mistakes to Avoid
When removing old spark plug wires, there are several common mistakes to watch out for:
| Mistake | Consequence | Prevention |
|---|---|---|
| Pulling on the wire instead of the boot | Damage to the wire or spark plug | Grasp the boot firmly and pull |
| Not noting the wire routing | Confusion during reinstallation | Take a photo or make a note |
| Using excessive force | Damage to the spark plug or wire | Apply gentle, consistent pressure |
By following the step-by-step removal process and avoiding common mistakes, you can ensure a smooth transition to new spark plug wires, enhancing your vehicle’s performance and reliability.
Installing New Spark Plug Wires
To ensure your vehicle runs smoothly, installing new spark plug wires correctly is essential. This process involves several key steps that, when followed, will help maintain your vehicle’s performance and prevent future issues.
Selecting the Correct Order
The first step in installing new spark plug wires is to ensure you’re using the correct order. This means understanding the firing order of your engine, which can usually be found in your vehicle’s repair manual or on a label under the hood. The firing order is crucial because it dictates how the spark plug wires should be connected to the spark plugs and the distributor cap.
- Check your vehicle’s manual for the firing order.
- Identify the spark plug wires and their corresponding spark plugs.
- Match the new spark plug wires to the correct spark plugs based on the firing order.
Snapping Wires into Place
Once you’ve identified the correct order, it’s time to snap the new spark plug wires into place. This involves gently but firmly pushing the wires onto the spark plugs and the distributor cap until they click or snap into position.
Tips for snapping wires into place:
- Ensure the wires are fully seated on the spark plugs.
- Use a gentle twisting motion to help the wires snap into place if necessary.
- Double-check that all wires are securely attached.
Ensuring a Secure Fit
After installing the new spark plug wires, it’s crucial to ensure they have a secure fit. This means checking that all connections are tight and that the wires are properly routed to avoid any damage or interference with other engine components.
A secure fit is essential for preventing misfires and ensuring optimal engine performance.

By following these steps and ensuring a secure fit, you can confidently complete the installation of your new spark plug wires. This not only enhances your vehicle’s performance but also contributes to a longer lifespan for your engine.
Testing the New Installation
Once you’ve installed the new spark plug wires, a thorough test is necessary to confirm everything is in working order. This step is crucial in ensuring that your DIY spark plug wire replacement is successful and that your vehicle runs smoothly.
How to Check Connection Integrity
To verify the integrity of the connections, start by visually inspecting the spark plug wires for any signs of damage or wear. Ensure that all wires are securely connected to the spark plugs and the ignition coil. You can perform a simple test by gently tugging on the wires to check if they are properly seated.
Key checks to perform:
- Inspect wires for cracks or damage
- Verify secure connections at both ends
- Check for any signs of overheating
Signs Your Installation is Successful
A successful installation is indicated by a smooth-running engine, improved performance, and the absence of misfires. You may also notice improvements in fuel efficiency and overall engine responsiveness.
Indicators of a successful installation include:
| Indicator | Description |
|---|---|
| Smooth Engine Operation | The engine runs without misfires or hesitation |
| Improved Performance | Noticeable increase in engine responsiveness and power |
| Enhanced Fuel Efficiency | Better fuel economy due to proper spark plug wire function |
Maintenance Tips for Spark Plug Wires
Proper maintenance of your spark plug wires is crucial for the longevity and performance of your vehicle. Regular upkeep can prevent issues that lead to costly repairs and ensure your car runs efficiently. In this section, we’ll explore essential tips for maintaining your spark plug wires.
Regular Inspection Routines
Inspecting your spark plug wires regularly is vital. Look for signs of wear such as cracks, frays, or corrosion. Check the boots and terminals for any damage or deterioration. It’s recommended to inspect your spark plug wires every 30,000 to 50,000 miles, or as specified in your vehicle’s manual.
During inspection, ensure that the wires are properly routed and not touching any hot engine parts. Misrouted wires can cause damage and lead to premature wear. Use a flashlight and inspection mirror if necessary, to check hard-to-see areas.
When to Replace Wires Again
Knowing when to replace your spark plug wires again is crucial for maintaining your vehicle’s performance. Typically, spark plug wires should be replaced between 60,000 to 100,000 miles. However, this can vary based on the vehicle’s make, model, and driving conditions.
If you notice any signs of wear or if your vehicle is experiencing misfires, it’s time to consider replacing your spark plug wires. Upgrading to high-quality spark plug wires can improve your vehicle’s performance and fuel efficiency. Consider a “spark plug wire upgrade” if you’re looking to enhance your vehicle’s capabilities.
Keeping Wires Protected
Protecting your spark plug wires from damage is essential. Use wire looms or protective sleeves to prevent abrasion and damage from heat. Ensure that the wires are securely fastened and not loose, which can cause them to vibrate excessively and wear out faster.
As you maintain your spark plug wires, remember that a successful “DIY spark plug wire replacement” requires attention to detail and the right tools. By following these tips, you can extend the life of your spark plug wires and keep your vehicle running smoothly.

Troubleshooting Common Issues
Troubleshooting common spark plug wire problems is crucial for maintaining your vehicle’s performance. Despite careful installation, issues can arise, and addressing them promptly is key to avoiding further damage.
Spark Plug Wire Misfires
Spark plug wire misfires can lead to decreased engine performance and fuel efficiency. Common causes include worn or damaged spark plug wires, incorrect wire routing, or faulty spark plugs.
- Inspect wires for signs of wear or damage.
- Check wire routing to ensure it follows the manufacturer’s specifications.
- Test spark plugs to identify any faulty plugs.
Loose Connections
Loose connections can cause a range of problems, including misfires and reduced engine performance. Ensuring that all connections are secure is vital.
| Cause | Symptoms | Solution |
|---|---|---|
| Loose spark plug wire connections | Misfires, rough idling | Tighten connections, inspect for damage |
| Incorrect wire installation | Engine hesitation, poor performance | Reinstall wires correctly, following manufacturer’s guide |
Symptoms of Incorrect Installation
Incorrect installation of spark plug wires can lead to a variety of issues, including engine misfires, decreased performance, and potentially damaging your vehicle’s engine.
Common symptoms include:
- Engine misfires or rough idling
- Decreased fuel efficiency
- Noticeable decrease in engine performance
If you experience any of these symptoms, it’s essential to inspect your spark plug wires and their installation.
Frequently Asked Questions
As a car owner, you’re likely to have questions about spark plug wires, including how often to replace them and whether you can do it yourself. Spark plug wires are a crucial part of your vehicle’s ignition system, and understanding their maintenance is key to ensuring your car runs smoothly.
How Often Should I Replace Spark Plug Wires?
The frequency of replacing spark plug wires depends on several factors, including the type of vehicle you own, driving conditions, and the quality of the spark plug wires themselves. Generally, spark plug wires should be replaced every 30,000 to 50,000 miles. However, it’s essential to consult your vehicle’s owner’s manual or speak with a mechanic to determine the best replacement schedule for your specific vehicle.
| Vehicle Type | Recommended Replacement Interval |
|---|---|
| Standard Vehicles | 30,000 – 50,000 miles |
| High-Performance Vehicles | 15,000 – 30,000 miles |
Can I Replace Spark Plug Wires on My Own?
Yes, replacing spark plug wires can be a DIY-friendly task if you have the right tools and follow the correct procedure. It’s essential to ensure you purchase the correct type of spark plug wires for your vehicle and follow the manufacturer’s instructions. If you’re not comfortable with DIY projects, it’s always best to consult a professional mechanic.

What Are Performance Spark Plug Wires?
Performance spark plug wires are designed to provide a stronger spark to your engine, potentially improving performance, fuel efficiency, and overall engine reliability. They are typically made with higher-quality materials and are designed to withstand the rigors of high-performance driving. Upgrading to performance spark plug wires can be a good option if you’re looking to enhance your vehicle’s performance.
In conclusion, understanding the answers to these frequently asked questions can help you make informed decisions about your spark plug wires, whether you’re replacing them or upgrading to performance wires.
Enhancing Performance with Quality Wires
Investing in high-quality spark plug wires is a simple yet effective way to enhance your vehicle’s power and efficiency. Upgrading your spark plug wires can have a significant impact on your vehicle’s overall performance.
Benefits of Upgrading
Upgrading your spark plug wires can lead to several benefits, including improved engine performance, better fuel efficiency, and a smoother ride. High-quality spark plug wires ensure a stronger spark, which is essential for optimal engine operation.
The benefits of upgrading include:
- Better engine performance
- Improved fuel efficiency
- Smoother engine operation
- Enhanced overall vehicle performance
Top Performance Brands to Consider
When it comes to selecting the best spark plug wires for your vehicle, several top brands stand out. Brands like NGK and AC Delco are known for their high-quality products that can enhance your vehicle’s performance.
Some key factors to consider when choosing a brand include:
- Quality of materials
- Compatibility with your vehicle
- Brand reputation
- Customer reviews
Environmental Considerations
Replacing spark plug wires is not just about enhancing your vehicle’s performance; it also involves responsible disposal practices. As you complete your DIY spark plug wire replacement project, it’s essential to consider the environmental impact of disposing of the old wires.
Recyclable Materials for Old Wires
Many spark plug wires are made from materials that can be recycled, such as copper and other metals. Identifying the recyclable components in your old spark plug wires can significantly reduce the environmental footprint of your DIY project. You can take the old wires to a local recycling center that accepts automotive parts.

Disposal of Old Spark Plug Wires
If the spark plug wires are not recyclable, they must be disposed of properly. Check with local waste management facilities to see if they have specific guidelines for disposing of automotive parts. Some communities have designated collection days for hazardous waste, which may include old spark plug wires.
To minimize environmental harm, avoid disposing of spark plug wires in regular trash. Instead, take advantage of recycling programs or hazardous waste collection facilities. By doing so, you’ll be contributing to a more sustainable automotive maintenance practice.
Conclusion
Replacing spark plug wires is a straightforward DIY project that can significantly enhance your vehicle’s performance. By following the steps outlined in this guide, you can successfully complete a DIY spark plug wire replacement.
Key Takeaways
The major steps involved in spark plug wire replacement include locating the spark plug wires, removing the old wires, and installing new ones. Ensuring a secure fit and testing the new installation are crucial for optimal performance.
Embarking on the DIY Journey
With the right tools and a bit of patience, you can tackle this project with confidence. Spark plug wire replacement is a manageable task that can improve your vehicle’s efficiency and overall driving experience. Take the first step towards a smoother ride by attempting this DIY project.


