
")


Replacing a car’s serpentine belt at home can seem like a daunting task, but with the right guidance, it’s a manageable project that can save you money on labor costs.
This DIY project requires some basic knowledge and the right tools. By following a step-by-step guide, you can successfully replace your car’s serpentine belt quickly and safely.
A serpentine belt replacement guide will walk you through the process, providing you with the necessary instructions to complete the task without professional help.
Key Takeaways
- Replacing a serpentine belt is a manageable DIY project.
- Following a step-by-step guide ensures a successful replacement.
- Basic knowledge and the right tools are necessary.
- You can save money on labor costs by doing it yourself.
- A serpentine belt replacement guide provides necessary instructions.
Introduction to Serpentine Belts
Understanding your car’s serpentine belt is essential for maintaining its overall health and performance. The serpentine belt is a vital component that powers several engine accessories, and its failure can lead to costly repairs.
What is a Serpentine Belt?
A serpentine belt is a long, rubber belt that winds its way through various pulleys in your car’s engine. It is designed to power multiple engine components, such as the alternator, power steering pump, and air conditioning compressor, using a single belt.
Functions of a Serpentine Belt
The primary function of the serpentine belt is to transmit power from the engine’s crankshaft to various accessories. This belt helps to operate critical systems, ensuring your car runs smoothly and efficiently.
The serpentine belt also helps to:
- Power the alternator, which charges your car’s battery
- Drive the power steering pump, making it easier to steer your vehicle
- Operate the air conditioning compressor, keeping you cool on hot days
Signs of a Worn-Out Belt
Over time, the serpentine belt can wear out, leading to potential engine damage if not replaced. Some common signs of a worn-out serpentine belt include:
| Signs | Description |
|---|---|
| Cracks or frays | Visible cracks or frays on the belt’s surface indicate wear and tear. |
| Squealing noises | A squealing or chirping noise coming from the engine area can signal a worn-out belt. |
| Slipping or misalignment | If the belt is slipping or misaligned, it can cause engine accessories to malfunction. |
Recognizing these signs early can help you avoid more significant problems down the road. Regular inspection and maintenance of your serpentine belt are crucial for serpentine belt maintenance and overall vehicle health.
Tools You Need for the Job
A successful serpentine belt replacement starts with preparation, including having the right tools on hand. Gathering the necessary tools beforehand will make the process smoother and less frustrating.
Essential Tools for DIY Replacement
To replace your car’s serpentine belt, you’ll need a few essential tools. These include a socket wrench or ratchet, a belt tensioner tool, and a new serpentine belt that matches your vehicle’s specifications. The belt tensioner tool is particularly crucial as it allows you to relieve tension on the belt, making it easier to remove.

Safety Gear to Consider
Safety should always be a priority when working on your vehicle. Protective gloves and safety glasses are recommended to safeguard against potential hazards such as sharp edges or flying debris. Additionally, ensure your workspace is well-ventilated to avoid inhaling any harmful fumes.
Optional Tools That Might Help
While not necessary, certain optional tools can make the replacement process easier. A repair manual specific to your vehicle’s make and model can provide valuable guidance. A flashlight can also be helpful for illuminating dark or hard-to-reach areas.
| Tool | Purpose |
|---|---|
| Socket wrench or ratchet | For loosening and tightening bolts |
| Belt tensioner tool | For relieving tension on the serpentine belt |
| Protective gloves | For protecting hands from sharp edges and debris |
| Safety glasses | For protecting eyes from flying debris |
Preparing Your Workspace
A well-prepared workspace is crucial for successfully replacing your car’s serpentine belt at home. This step is often overlooked, but it makes a significant difference in the efficiency and safety of the replacement process.
Finding a Suitable Location
When it comes to DIY car repair, the location is key. Choose a flat, stable surface that is far away from traffic. Ensure the area is clear of any flammable materials and has good ventilation to prevent inhalation of fumes.
Ideally, work in a garage or a well-ventilated area. If you’re working outdoors, consider the weather conditions to avoid any complications.
Organizing Your Tools
Having the right tools within reach can significantly streamline the auto serpentine belt replacement process. Organize your tools in a way that they are easily accessible. Use a toolbox or a tray to keep everything in order.
- Socket set
- Wrench set
- Pliers and screwdrivers
- Serpentine belt diagram (if available)
Tip: Labeling your tools can help you quickly identify what you need.
Ensuring Proper Lighting
Adequate lighting is essential for a successful DIY project. Ensure the area is well-lit to help you see the serpentine belt diagram and other components clearly.
If natural light is not available, use LED work lights or a portable lamp to illuminate your workspace. Proper lighting will reduce eye strain and help prevent mistakes during the replacement process.
Understanding the Serpentine Belt Layout
To successfully replace a serpentine belt, you must first comprehend its layout and how it interacts with other engine components. The serpentine belt is a critical part of your vehicle’s engine, powering various accessories such as the alternator, power steering pump, and air conditioning compressor.
Examining Your Vehicle’s Belt Diagram
The first step in understanding the serpentine belt layout is to locate and examine the belt diagram. This diagram is usually found on a label under the hood of your vehicle or in the owner’s manual. It provides a visual representation of how the belt is routed around the various pulleys.

How to Access the Belt Layout
To access the belt layout, you may need to consult your vehicle’s repair manual or look for the diagram under the hood. Some vehicles have the diagram printed on a sticker or placard, making it easily accessible. If you’re having trouble finding it, you can also search online for your specific vehicle’s make and model to find the correct diagram.
Importance of Belt Path Knowledge
Understanding the belt path is crucial for a successful DIY serpentine belt replacement. Knowing how the belt is routed around the pulleys ensures that you can correctly install the new belt. Misrouting the belt can lead to poor engine performance, premature wear on the belt and other components, and potentially cause the belt to fail.
By familiarizing yourself with the serpentine belt diagram and understanding the belt path, you’ll be better equipped to navigate the replacement process with confidence. This knowledge is essential for ensuring that your vehicle continues to run smoothly and efficiently after the replacement.
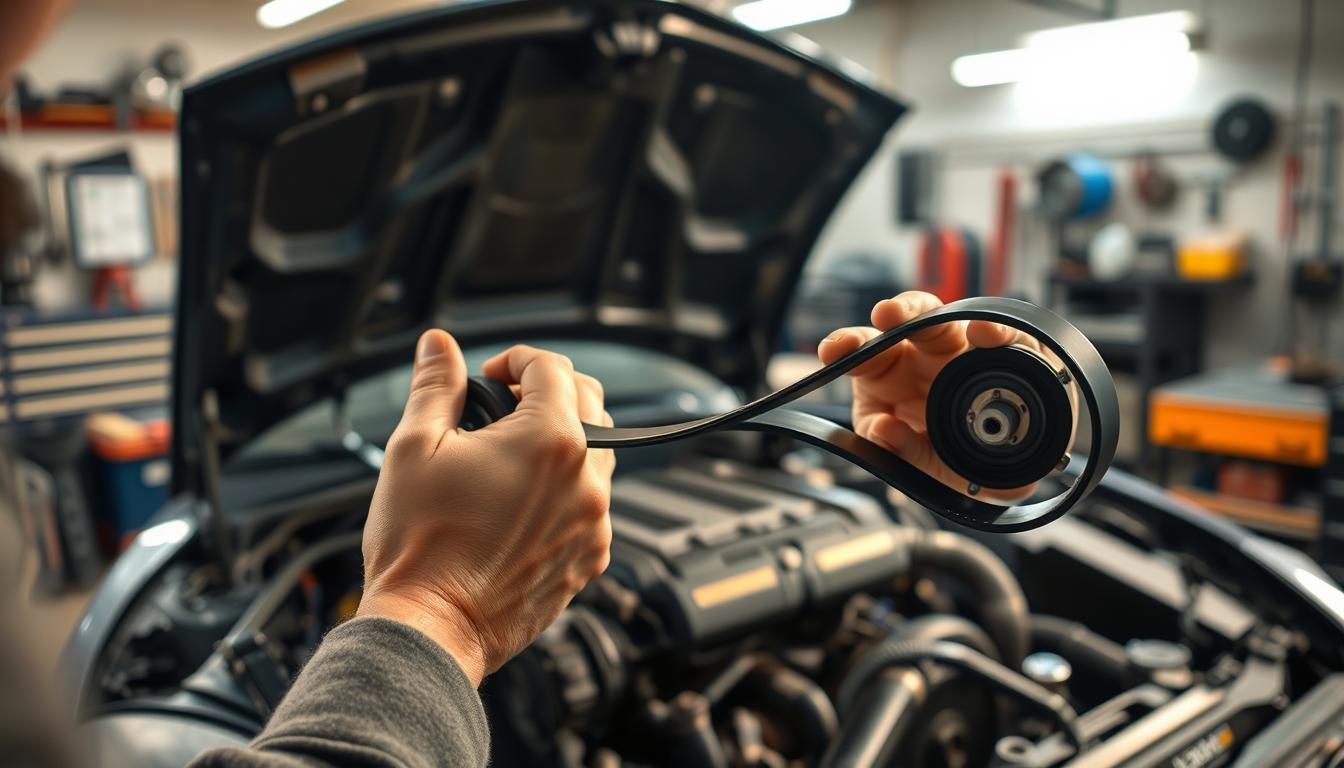
Removing the Old Serpentine Belt
The first step in replacing your car’s serpentine belt is removing the old one, a process that requires careful attention to detail. This step is crucial for a successful auto serpentine belt replacement and ensures that you can complete the task without damaging other components.
Disconnecting the Battery
Before starting, it’s essential to disconnect the battery to prevent any accidental engine starts or electrical shocks. Locate your car’s battery and loosen the nut on the clamp that holds the negative (black) cable in place. Once loose, pull the cable off the negative terminal and tuck it away from the battery to prevent it from coming into contact with the terminal again.
Relieving Tension on the Belt
The serpentine belt tensioner is responsible for keeping the belt tight. To remove the belt, you’ll need to relieve this tension. Use a wrench or socket to apply pressure to the tensioner, moving it in the direction indicated by the manufacturer’s diagram or the tensioner’s design. This will loosen the belt, making it easier to remove.
Taking Off the Old Belt
With the tension relieved, you can now remove the old serpentine belt. Carefully pull the belt off the pulleys, taking note of its routing for reference when installing the new belt. Inspect the belt for any signs of wear or damage, which can help you identify potential issues with the pulleys or tensioner.
| Step | Description | Tool Required |
|---|---|---|
| 1 | Disconnect the Battery | Wrench or Socket |
| 2 | Relieve Tension on the Belt | Wrench or Socket |
| 3 | Remove the Old Belt | – |
By following these steps, you’ll be able to successfully remove the old serpentine belt, completing a critical part of the DIY car repair process.
Inspecting the Pulleys and Tensioner
After removing the old serpentine belt, it’s essential to inspect the pulleys and tensioner to ensure the new belt operates smoothly. This step is crucial for preventing future issues and prolonging the life of the new belt.
Checking for Wear and Tear
Begin by visually inspecting the pulleys for any signs of wear, such as grooves, rust, or misalignment. Any worn-out pulley can cause the new belt to deteriorate quickly. Check the condition of the bearings by spinning them; they should rotate smoothly without any grinding noise.

Testing the Tensioner Spring
The tensioner spring plays a vital role in maintaining the correct tension on the serpentine belt. To test it, use a tensioner tool or a breaker bar to release the tension. If the tensioner does not move smoothly or shows signs of wear, consider replacing it.
Cleaning the Pulley Surfaces
Clean the pulley surfaces to remove any dirt, grime, or old belt material. Use a suitable cleaning solution and a brush to ensure the surfaces are smooth and clean. This step is vital for ensuring proper belt alignment and preventing slippage.
Here’s a summary of the inspection process in a tabular format:
| Component | Inspection Criteria | Action Required |
|---|---|---|
| Pulleys | Check for grooves, rust, or misalignment | Replace if worn out |
| Tensioner Spring | Test for smooth movement and wear | Replace if faulty |
| Pulley Surfaces | Cleanliness and smoothness | Clean thoroughly |
By following these steps, you can ensure that your serpentine belt system is in good condition, ready for the new belt installation. Regular inspection and maintenance are key to a successful DIY serpentine belt replacement.
Choosing the Right Replacement Belt
Selecting the correct replacement serpentine belt is crucial for maintaining your vehicle’s performance and preventing potential engine damage. The serpentine belt is a critical component that powers various engine accessories, and its replacement requires careful consideration.
Factors to Consider When Selecting a Belt
When choosing a replacement serpentine belt, several factors come into play. The belt’s material, size, and compatibility with your vehicle’s make and model are essential considerations. High-quality materials ensure durability and resistance to wear and tear.
To make an informed decision, consult your vehicle’s manual or manufacturer’s website for specifications. You can also check the belt itself for any labeling or markings that indicate its type and size.
Comparing OEM vs. Aftermarket Belts
The debate between Original Equipment Manufacturer (OEM) parts and aftermarket alternatives is ongoing. OEM belts are designed to meet the exact specifications of your vehicle, ensuring a precise fit and optimal performance. Aftermarket belts, on the other hand, can offer cost savings and sometimes improved durability.
| Feature | OEM Belts | Aftermarket Belts |
|---|---|---|
| Quality | High, meets manufacturer specs | Varies by brand, can be high |
| Cost | Generally more expensive | Often less expensive |
| Warranty | Typically backed by manufacturer’s warranty | Warranty varies by manufacturer |
Tips for Getting the Correct Size
Ensuring the correct size of the replacement serpentine belt is vital. Here are some tips:
- Check the vehicle’s manual for the belt’s specifications.
- Inspect the old belt for any markings or labels that indicate its size.
- Use a belt sizing chart or consult with an auto parts professional if you’re unsure.
By considering these factors and tips, you can confidently choose the right replacement serpentine belt for your vehicle, ensuring its longevity and performance.
Installing the New Serpentine Belt
To ensure your vehicle runs smoothly, it’s crucial to install the new serpentine belt correctly. This process involves several key steps that, when followed, will have your car’s engine running like new.
Proper Installation Techniques
Before you start, make sure you have your vehicle’s repair manual handy. The manual will provide specific instructions tailored to your car’s make and model. Proper installation techniques are vital to avoid any damage to your engine or its components.
One of the most critical aspects is to ensure the belt is properly seated on all pulleys. Misalignment can lead to premature wear or even cause the belt to slip off during operation. Take your time to double-check the belt’s position.
Routing the New Belt
Routing the new serpentine belt correctly is essential for its longevity and performance. Refer to your vehicle’s belt diagram, usually found on a sticker under the hood or in the repair manual, to understand the correct path. Pay close attention to the belt’s orientation; some belts have specific directions indicated by arrows on the belt.
As you route the belt, ensure it is snugly fitted around each pulley without any twists or overlaps. This step requires patience, as getting it right is crucial for the belt’s performance and to prevent unnecessary noise or vibration.
Ensuring Proper Tension
Proper tension is critical for the serpentine belt’s operation. A belt that is too loose can slip, causing it to wear out faster or even break, while a belt that is too tight can put excessive strain on the tensioner and other components.
| Tension Status | Effects on the Belt |
|---|---|
| Too Loose | Slippage, excessive wear, potential breakage |
| Too Tight | Excessive strain on tensioner and pulleys, potential for damage |
| Proper Tension | Optimal performance, longevity of the belt and components |
Use a tension gauge if available, or follow the manufacturer’s guidelines for manual adjustment. After setting the tension, start the engine and listen for any unusual noises that might indicate improper tension or alignment.
“A well-installed serpentine belt is key to a vehicle’s overall performance and longevity. Ensuring it’s done correctly can save you from future headaches and costly repairs.”
By following these steps and paying close attention to the details, you can successfully install a new serpentine belt. This DIY car repair task not only saves you money but also gives you a sense of accomplishment and a better understanding of your vehicle.
Reconnecting Any Components
With the new serpentine belt installed, it’s time to reconnect the components that were disconnected during the replacement process. This step is crucial for ensuring your vehicle operates safely and efficiently.
Reattaching the Battery
The first component to reconnect is typically the battery. To do this, locate the battery and its cables. Ensure the cables are clean and free of corrosion before reattaching them to the battery terminals. The positive (red) cable should be attached first, followed by the negative (black) cable. Make sure they are securely fastened to prevent any electrical issues.
Checking Electrical Connections
After reattaching the battery, inspect all electrical connections that were disturbed during the replacement process. Verify that all connectors are securely attached and that there are no signs of wear or damage. This includes any wiring or harnesses that may have been moved or disconnected.
Confirming All Parts Are Secure
Before starting the engine, conduct a thorough check to ensure all parts are secure. This includes the new serpentine belt, the tensioner, and any other components that were adjusted or removed. Double-check that all bolts and fasteners are tightened to the specified torque.
- Verify the serpentine belt is properly seated on all pulleys.
- Check that the tensioner is correctly adjusted and holding the belt at the proper tension.
- Ensure all electrical connections are secure and not damaged.
By following these steps, you can ensure that your vehicle is ready to run safely with the new serpentine belt. Remember, if you’re unsure about any part of the process, consulting a professional mechanic is always a good idea.
Testing the Installation
After successfully installing a new serpentine belt, it’s crucial to test the installation to ensure everything is working as expected. This step is vital for identifying any potential issues early on, which can save you from more significant problems down the road.
Starting the Engine
Begin by starting your engine. Listen carefully to the sounds it makes. A well-installed serpentine belt should result in a smooth engine operation. If you notice any unusual noises, such as squealing or grinding, it may indicate a problem with the belt’s alignment or tension.
Key things to check when starting the engine:
- Unusual noises
- Vibrations
- Smooth operation of accessories like the alternator and power steering pump
Listening for Unusual Noises
Pay close attention to any sounds emanating from the engine area. A properly installed serpentine belt should operate quietly. Any squealing, chirping, or other unusual noises could signify that the belt is not correctly aligned or that there’s an issue with one of the pulleys.
Common noises to watch out for:
- Squealing
- Grinding
- Chirping
Watching for Slips or Squeals
Observe the belt’s performance under load. You can do this by turning on various accessories like the air conditioning, headlights, and radio. If the belt squeals or slips, it may indicate that the tension is not correct or there’s an issue with the belt or one of the pulleys.
| Symptom | Possible Cause |
|---|---|
| Squealing Noise | Insufficient tension, worn-out belt, or misaligned pulley |
| Belt Slippage | Incorrect tension, worn-out belt, or dirty pulleys |
| Grinding Noise | Misaligned pulley, worn-out bearing, or incorrect belt routing |
By carefully testing your serpentine belt installation, you can ensure that your vehicle’s engine and accessories are running smoothly and efficiently. If you identify any issues during the test, refer back to the relevant sections to make the necessary adjustments.

Maintenance Tips for Longevity
The longevity of your serpentine belt depends on proper care and regular inspections. Maintaining your vehicle’s serpentine belt is not just about replacing it when it fails; it’s about ensuring it operates smoothly throughout its lifespan.
Regular Inspection of the Serpentine Belt
Regularly inspecting your serpentine belt is crucial for identifying signs of wear early on. Look for cracks, frays, or uneven wear patterns. It’s recommended to inspect the belt every 50,000 miles or as specified in your vehicle’s owner’s manual. Early detection of issues can prevent more costly repairs down the line.
Keeping Pulleys and Tensioners Lubricated
Pulleys and tensioners play a critical role in the operation of your serpentine belt. Keeping them lubricated can reduce friction and wear on the belt. Use a suitable lubricant as recommended by your vehicle’s manufacturer. Regular lubrication can significantly extend the life of your serpentine belt and its associated components.
Knowing When to Replace
Understanding when to replace your serpentine belt is vital for preventing unexpected failures.
“A serpentine belt typically needs to be replaced between 50,000 to 100,000 miles, depending on the vehicle and driving conditions.”
Always refer to your vehicle’s owner’s manual for the manufacturer’s recommended replacement interval. Replacing the belt at the right time can save you from the inconvenience and cost of a breakdown.
By following these maintenance tips, you can ensure your serpentine belt operates effectively for as long as possible, contributing to the overall health and efficiency of your vehicle’s engine.
Common Mistakes to Avoid
To ensure a smooth DIY serpentine belt replacement, it’s crucial to avoid common pitfalls. Many DIY enthusiasts make mistakes that can lead to further complications or even render the replacement ineffective.

Not Replacing the Tensioner
One of the most critical components to check during a serpentine belt replacement is the tensioner. Failing to replace a worn-out tensioner can cause the new belt to wear out prematurely. Inspect the tensioner for any signs of wear, such as rust or excessive play.
Failing to Check Other Components
It’s not just the serpentine belt that needs attention; other components like pulleys and idlers should also be inspected. Check for any signs of wear or damage on these parts, as they can affect the performance and longevity of the new belt.
- Inspect pulleys for any signs of wear or misalignment.
- Check idlers for smooth operation.
- Ensure all components are clean and free of debris.
Misrouting the New Belt
Misrouting the new serpentine belt is a common mistake that can lead to poor engine performance or even engine damage. Always refer to your vehicle’s serpentine belt diagram to ensure the belt is routed correctly.
- Consult your vehicle’s manual for the correct belt routing.
- Take a picture of the old belt before removing it to use as a reference.
- Double-check the belt’s path around each pulley.
By avoiding these common mistakes, you can ensure a successful serpentine belt replacement guide and prolong the life of your vehicle’s engine.
Conclusion
Replacing your car’s serpentine belt is a manageable DIY car repair task that can save you money and give you a sense of accomplishment. By following the steps outlined in this guide, you’ve gained hands-on experience with auto serpentine belt replacement.
Key Takeaways from the Replacement Process
The process involves understanding the serpentine belt layout, removing the old belt, inspecting pulleys and tensioners, and installing a new belt. Proper serpentine belt maintenance is crucial for the longevity of your vehicle’s engine and accessories.
Empowering Future DIY Maintenance
With this experience, you’re better equipped to tackle other DIY maintenance tasks. Regular checks and timely replacements can prevent more costly repairs down the line. Remember, a well-maintained serpentine belt is key to a healthy engine.
Final Vehicle Care Tips
To keep your vehicle running smoothly, stay on top of routine maintenance. Regularly inspect your serpentine belt for signs of wear, and don’t hesitate to replace it when necessary. By doing so, you’ll ensure your car continues to run efficiently and effectively.


